Frequently asked questions (FAQ)
Here, you will learn how to customize the scikit-package template for your own project, such as setting the line-width and including/excluding files for PyPI distribution. We also provide design decisions for the current setup of the scikit-package template.
Pre-commit
Pre-commit attempts to automatically fix code style issues. The following questions are used to customize the pre-commit configuration for your project’s needs.
How is pre-commit used in each Level?
Here is a recommended setup and hooks for pre-commit for each level:
Level |
Name |
Recommended setup |
Hooks used |
|---|---|---|---|
3 |
|
Run |
Automatic linting with |
4 |
|
Use |
Level 3 hooks, PEP 8 check with |
5 |
|
Same as Level 4 |
Level 4 hooks, no commits to |
How do I modify line-width limits?
The following files need to be modified:
In
.isort.cfg, modifyline_length.In
.flake8, modifymax-line-length.In
pyproject.toml, modifyline-lengthunder[tool.black].
See also
As recommended by PEP 8, comments and docstrings should be wrapped at 72 characters, as defined under [tool.docformatter] in pyproject.toml.
How do I skip a specific file for flake8 and black?
To skip files checked by flake8, include the file path in .flake8 under the exclude section.
To prevent black from formatting, include the file path in pyproject.toml under the [tool.black] section.
How do I suppress the flake8 error?
Ad # noqa: <error-code> at the end of the line. For example, import numpy as np # noqa: E000.
How do I fix conflicted hook auto-fix errors?
You may encounter the following error message when you run git commit -m <your-commit-message>:
Stashed changes conflicted with hook auto-fixes...
To solve this problem, run git add <file> on the files modified by pre-commit. Then, re-enter same commit message above using git commit -m <your-commit-message>. Why do we need to run git add again? The files that are linted by pre-commit are not staged to the local Git database. So, we stage them manually again with git add.
How do I ignore words/lines/files in automatic spelling checks in pre-commit?
To ignore a word, add it to .codespell/ignore_words.txt. You can find an example file here: https://github.com/diffpy/diffpy.fourigui/blob/main/.codespell/ignore_words.txt.
To ignore a specific line, add it to .codespell/ignore_lines.txt. See an example below:
;; src/translation.py
;; The following single-line comment is written in German.
# Hallo Welt
To ignore a specific file extension, add *.ext to the skip section under [tool.codespell] in pyproject.toml. You can find an example file here: https://github.com/diffpy/diffpy.fourigui/blob/main//pyproject.toml.
Project setup
I read scikit-package allows namespace support for importing packages. What is it, and how do I set it up?
A research group often maintains multiple software packages under a single GitHub organization. For the purposes of branding and also differentiating packages with similar names, it can sometimes be beneficial for the organization or research group name (or some other branding name) to appear in the package name itself.
Here is an example. Consider the package called diffpy.pdffit2. The package starts with an organization identifier of diffpy, and the package name is pdffit2. There is a separate GitHub repository for this package (https://github.com/diffpy/diffpy.pdffit2) while it is developed under the DiffPy organization (https://github.com/diffpy). The user can import the package as import diffpy.pdffit2 as pdffit2 in any Python script.
Note
This namespace feature is only available in Level 5, public. In programming, a “namespace” refers to a unique identifier that can hold many classes, functions, and variable names. Here we extend the concept that the top level namespace holds multiple packages.
What is the difference in folder structure compared to a standard package?
For a standard package, the folder structure is as follows:
├── src
│   ├── <package_name>
│   │   ├── __init__.py
│   │   ├── file_one.py
│   │   ├── file_two.py
For a package to be imported using import <namespace_name>.<package_name>, the folder structure is as follows:
├── src
│   ├── <namespace_name>
│   │   ├── __init__.py
│   │   └── <package_name>
│   │       ├── __init__.py
│   │       ├── file_one.py
│   │       ├── file_two.py
How do I set it up with scikit-package?
Our scikit-package automatically handles this folder setup for you! When you run package create public, simply enter project_name as, e.g., <namespace_name>.<package_name>, like the default value provided. scikit-package adjusts the folder structure based on the presence of the . that separates the <namespace_name> and <package_name>.
In Level 5, why do we adopt README.rst instead of README.md?
We adopt README.rst at Level 5 because reStructuredText (.rst) provides a more configurable format and control. One key advantage of .rst is its native support for advanced formatting, such as precise control over image size and layout:
.. |Icon| image:: img/logos/scikit-package-logo-text.png
    :target: https://scikit-package.github.io/scikit-package
    :height: 150px
Achieving the same result in Markdown often requires raw HTML, which is less readable and may render inconsistently across platforms.
Switching to README.rst at Level 5 helps users appreciate the formatting power of .rst and serves as a stepping stone toward writing full documentation in .rst as part of the scikit-package documentation standard.
How can I change the default values that appear in the prompt when creating projects in Level 3,4,5?
You can override the existing default values in the prompt by creating and editing a configuration file .skpkgrc in the user home directory. In bash your home directory is designated by ~.
Here are the steps you can follow to override the default values for Level 5 usage.
Go to
homedirectory.
cd ~
Create
.skpkgrc.
touch .skpkgrc
Edit
.skpkgrc. Copy and paste the following snippets to.skpkgrc.
{
  "default_context":
    {
        "maintainer_name": "<local-default-maintainer-name>",
        "maintainer_email": "<local-default-maintainer-email>",
        "maintainer_github_username": "<local-default-maintainer-github-username>",
        "github_username_or_orgname": "<local-default-github-username-or-orgname>",
        "contributors": "<local-default-contributors-name>",
        "license_holders": "<local-default-license-holders-name>",
        "project_name": "<local-default-project-name>",
    }
}
Replace words in angle brackets with values you prefer. These values will be your new default values when you run scikit-package on your local machine. In your
.skpkgrcyou may delete any rows that you do not want to modify from the package defaults.
See also
Creating packages in Level 3, 4 and 5 requires different entries. When you create a package at a certain level, only the entries with matched names will be processed. So irrelevant entries have no effect and you can set all the level 3, 4 and 5 default values in .skpkgrc.
How can I change the location of configuration file?
The scikit-package configuration file is located in ~/.skpkgrc by default. You can use the environment variable SKPKG_CONFIG_FILE to change its location.
export SKPKG_CONFIG_FILE=/path/to/config
Release
Release CI failed. What should I do?
Pre-release:
Did you encounter an error under the
privilege-checksection in the workflow? Ensure the user performing the release has the GitHub username specified inmaintainer_github_usernameunder.github/workflows/build-wheel-release-upload.yml.Did you encounter an error related to
PYPI? Ensure you havePAT_TOKENconfigured at the organization or repository level. Please read Appendix 1. Setup PYPI_TOKEN to allow GitHub Actions to upload to PyPI. Even ifPYPI_TOKENis already configured, ensure it is the latest token and has not been revoked or expired.Note
As the next step, if you created and pushed
*.*.*-rc.0, you may simply bump and create a new version tag of*.*.*-rc.1and push it to the remote repository.
Release:
Did you encounter an error related to
fatal: could not read Username? Ensure you havePAT_TOKENconfigured at the organization or repository level. Please read Appendix 2. Setup PAT_TOKEN to allow GitHub Actions to compile CHANGELOG.rst. Even ifPAT_TOKENis already configured, ensure it is the latest token and has not been revoked or expired.Did you encounter any error from
Rulesets? In your repository, visit . Then click one or more of the rulesets. For each ruleset, under the Bypass list, click Add bypass and Organization admin to the ruleset. The GitHub workflow will use thePAT_TOKENto bypass the ruleset.Note
Here, we don’t want to bump a new version. As the next step, delete the Git tag in the local by running
git tag -d <tagname>and visithttps://github.com/<org-or-username>/<package-name>/tagsto delete it in the remote. Then, follow the same process for a full release by creating a new tag and pushing it to the remote.
How is the package version set and retrieved?
In pyproject.toml, the setuptools-git-versioning tool is used to dynamically retrieve the version based on the latest tag in the repository. The latest tag is pushed during the release workflow. The dynamically parsed version is globally accessible, via <package-name>.__version__.
How do I include/exclude files in PyPI release?
The MANIFEST.in file is used to control which files are included in the source distribution. Try running python -m build and see the content under the dist folder generated.
To include all files under a folder, use graft:
graft src
graft tests
To include specific file(s), use include:
include AUTHORS.txt LICENSE*.txt README.rst
To exclude files globally, use globally-exclude:
global-exclude *.py[cod]  # Exclude all .pyc, .pyo, and .pyd files.
global-exclude .DS_Store  # Exclude Mac filesystem artifacts.
global-exclude __pycache__  # Exclude Python cache directories.
global-exclude .git*  # Exclude git files and directories.
Why have we decided to include test files in the PyPI source distribution?
We decided to include test files in the PyPI source distribution to facilitate unit testing with a newly built Conda package.
The conda-forge CI uses the source code distributed via PyPI to build a Conda package. After building the package, we want to run pytest to ensure all unit tests pass before release. Therefore, test files must be included in the source code. In contrast, no documentation is distributed with the package, as it is already accessible from the GitHub repository and does not serve a practical purpose in the distribution package itself.
Documentation
How can I preview the documentation in real-time?
Install documentation related dependencies:
conda install --file requirements/docs.txt
Enter into the
docsproject directory and render documentation:cd docs make html
Open the rendered documentation via web browser:
open build/html/index.htmlHere is a shortcut if you want to use it from the root directory of the project:
cd docs && make html && open build/html/index.html && cd ..
See also
You can use a
aliasshortcut. Open~/.bashrcin your text editor and add the following line:alias doc='cd docs && make html && open build/html/index.html && cd ..'
Apply the changes to your current terminal session:
source ~/.bashrc
Now, you can simply enter the
docscommand in your terminal to build and open the documentation:doc
(Optional for macOS/Linux only) Do you want to re-render documentation without running doc command every time? You can use sphinx-reload.
Install the dependencies including
sphinx-reloadsourced fromPyPI:conda install --file requirements/docs.txt pip install sphinx-reloadRun the following command to start live-reloading:
sphinx-reload docsNow, each time you make changes to the documentation, it will be automatically reloaded in your web browser.
How do I build API .rst files automatically for a standard Python package?
Here is how you can automate the process of generating API documentation for a standard Python package located in the docs/source/api folder.
Note
Your package is considered a standard package if it is imported as import <package_name> instead of import <namespace_name>.<package_name>.
Add
sphinxcontrib-apidocto therequirements/docs.txtfile.sphinx sphinx_rtd_theme sphinx-copybutton sphinxcontrib-apidoc ...
Run
conda install --file requirements/docs.txtto install the new dependency.Replace the following code block in your
docs/source/conf.pyfile fromextensions = [ "sphinx.ext.autodoc", "sphinx.ext.napoleon", "sphinx.ext.todo", "sphinx.ext.viewcode", "sphinx.ext.intersphinx", "sphinx_rtd_theme", "sphinx_copybutton", "m2r2", ]
to
extensions = [
    "sphinxcontrib.apidoc",  # Add this extension to run sphinx-apidoc
    "sphinx.ext.napoleon",
    "sphinx.ext.todo",
    "sphinx.ext.viewcode",
    "sphinx.ext.intersphinx",
    "sphinx_rtd_theme",
    "sphinx_copybutton",
    "m2r2",
]

# Configure where to find the source code and write API .rst files
apidoc_module_dir = '../../src/<package_dir_name>'
apidoc_output_dir = 'api'
apidoc_excluded_paths = ['tests']
apidoc_separate_modules = True
Next to the
apidoc_module_dirvariable above, replace<package_dir_name>with the directory name undersrc, e.g.,my_package.Run
sphinx-reload docto build and host the documentation.Notice that the
.rstfiles underdocs/source/apiare generated whenever the documentation is re-rendered.Add the following block to your
docs/source/index.rstfile:.. toctree:: :maxdepth: 2 :caption: API Reference Package API <api/package_dir_name>Now, you should see the API Package section in the left menu bar of the documentation. Click on it to see the API documentation.
Done! If you have any issues, please feel free to open an issue in the
scikit-packageGitHub repository.
How do I build API .rst files for a Python package with a namespace import?
Install
scikit-packageif you haven’t already:conda install scikit-package
cdinto your project directory:cd <path-to-your-project>
Ensure you have the
APIsection indocs/source/index.rst:.. toctree:: :maxdepth: 2 :caption: API Reference Package API <api/package_dir_name>Run the following CLI command to generate
.rstfiles indocs/source/api:package build api-doc
Done!
How can I preview the documentation in each pull request?
Visit https://app.readthedocs.org/.
Click Log in using GitHub.
If your repository is under a GitHub organization, follow the extra steps below:
Click the Read the Docs Community application.
Click the Request button for the organization under Organization Access,
Done. Now, Read the Docs can import repositories in the GitHub organization.
Enter the Repository name.
Click Continue.
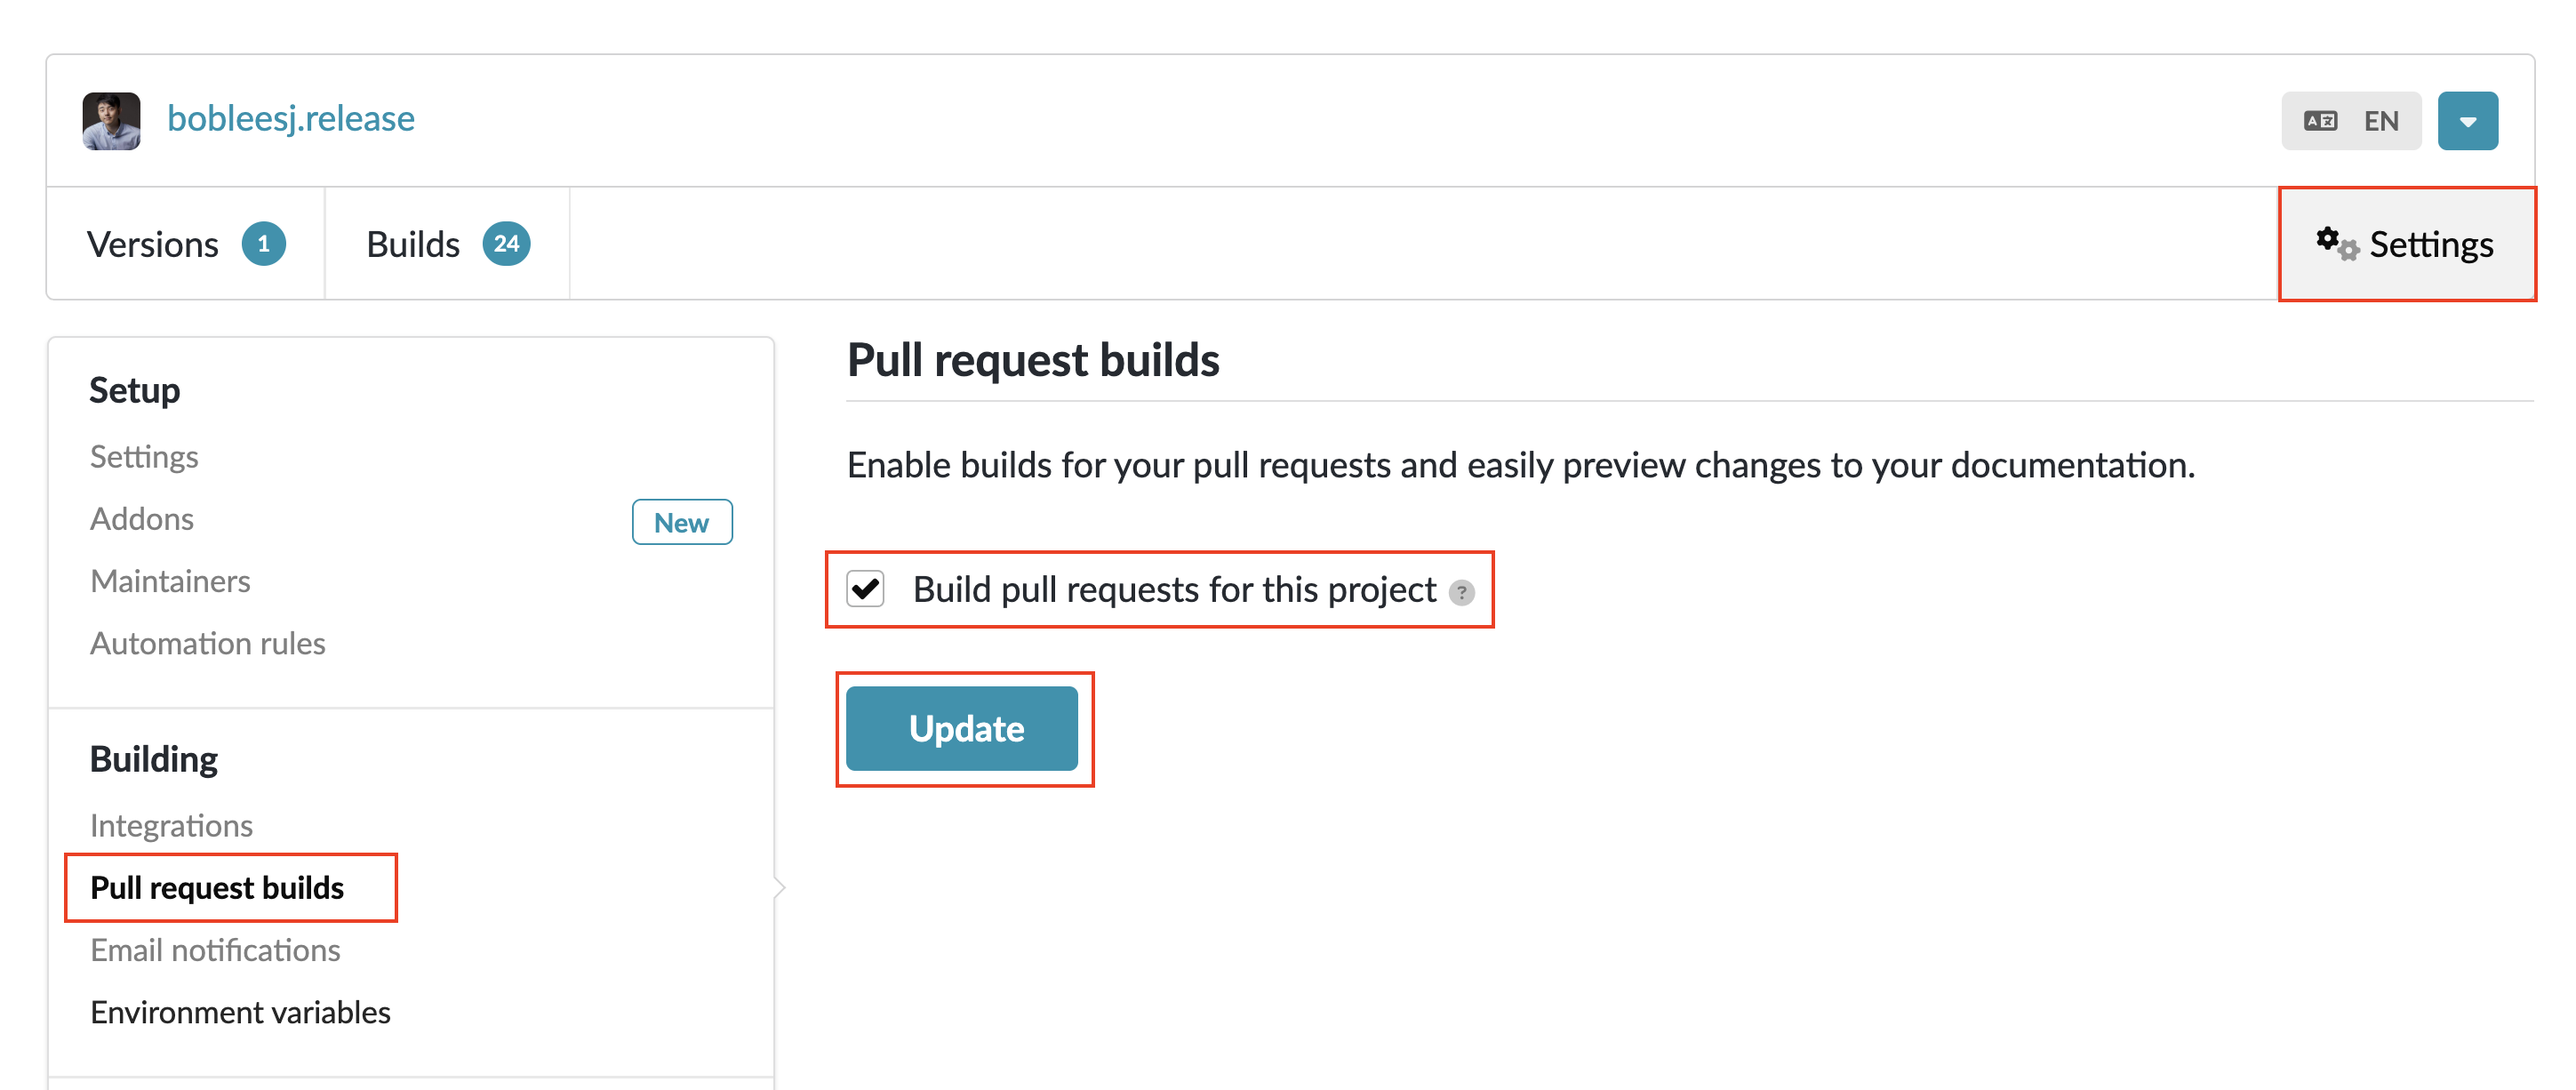
Visit your project page, e.g., https://app.readthedocs.org/projects/bobleesjrelease/.
Click Settings.
Click Pull request builds under Building on the left menu.
Enable Build pull requests for this project.
Click Update.
Done! Now, in each PR, you will see the following workflow triggered. You can click on the workflow to view its rendered documentation online.
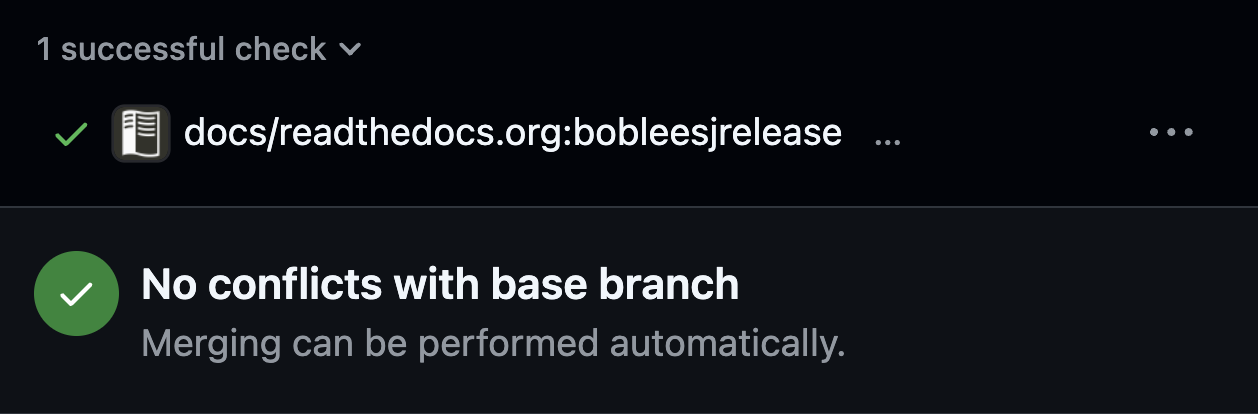
Tip
Press the d key on your keyboard to view the changes!
How do I re-deploy online documentation without another release?
Visit the following URL of your package: https://github.com/<org-name>/<package-name>/actions/workflows/publish-docs-on-release.yml i.e., https://github.com/diffpy/diffpy.utils/actions/workflows/publish-docs-on-release.yml.
Click Run workflow and select the main branch. Your online documentation will be updated with the latest changes without a new release.
How do I fix the “No module named” error when I render documentation?
(e.g., WARNING: autodoc: failed to import module 'tools' from module 'diffpy.pdfmorph'; the following exception was raised: No module named 'diffpy.utils'), it can be resolved by adding autodoc_mock_imports = [<pkg>] to your conf.py right under imports. This file is located in /docs/source/conf.py.
How do I add a favicon and logo to the documentation?
In docs/source/conf.py, add the following lines:
html_theme_options = {
  "navigation_with_keys": True,
  "logo_only": True,
}

html_favicon = "<path-to-favicon>"
html_logo = "<path-to-logo>"
The clickable logo will be displayed above the menu bar on the left side of the page.
conda-forge
How do I add a new admin to the conda-forge feedstock?
Please refer to the Add a new admin section.
How do I do pre-release for conda-forge?
Please refer to the How do I do pre-release? section.
GitHub Actions
In Level 5, how do I set different Python versions for GitHub CI?
By default, GitHub CI uses the Python versions declared in the
Programming Language :: Python :: classifiers in pyproject.toml.
'Programming Language :: Python :: 3.12'
'Programming Language :: Python :: 3.13'
'Programming Language :: Python :: 3.14'
You may override the Python versions above (those in pyproject.toml)
for GitHub CI workflows by specifying them directly in the workflow files:
Add
python_versionin.github/workflows/tests-on-pr.yml:
jobs:
  tests-on-pr:
    uses: scikit-package/release-scripts/.github/workflows/_tests-on-pr.yml@v0
    with:
      project: scikit-package
      c_extension: false
      headless: false
      python_version: 3.12
    secrets:
      CODECOV_TOKEN: ${{ secrets.CODECOV_TOKEN }}
Add
python_versionin.github/workflows/_publish-docs-on-release.yml:
jobs:
  docs:
    uses: scikit-package/release-scripts/.github/workflows/_publish-docs-on-release.yml@v0
    with:
      project: scikit-package
      c_extension: false
      headless: false
      python_version: 3.12
Add
python_versionsin.github/workflows/_matrix-and-codecov-on-merge-to-main.yml:
jobs:
  matrix-coverage:
    uses: scikit-package/release-scripts/.github/workflows/_matrix-and-codecov-on-merge-to-main.yml@v0
    with:
      project: scikit-package
      c_extension: false
      headless: false
      python_versions: "3.11,3.12"
If no Python versions are provided in either pyproject.toml or the workflow
files, the default Python version used in GitHub CI is 3.14.
In Level 5, what are the workflows running in each pull request?
The first workflow is called
Tests on PRfrom.github/workflows/tests-on-pr.yml. This workflow creates a new conda environment on Linux and installs the dependencies listed in therequirementsfolder using theconda-forgechannel. The conda environment is configured to use the highest Python version specified when the project was initially created. It then runs the unit tests located in thetestsfolder, similar to how you would run them locally.The second workflow uses
pre-commit CI. This workflow checks the incoming code in the PR usingpre-commithooks and automatically applies fixes when possible. If any fixes are made, an additional commit is created by thepre-commitapp. However, some hooks, such as spell checkers, may still fail even after auto-fixes. In such cases, the CI fails. The user first needs to pull the additional commit made by thepre-commit CI, fix the error manually, and then push a commit to the working branch.The third workflow uses the
Codecovapp, which adds a comment to the PR summarizing the changes in code coverage as part of the.github/workflows/tests-on-pr.ymlworkflow. This workflow fails if no tests are provided for the new code or if the test coverage percentage decreases below the acceptable threshold. The threshold can be adjusted in the.codecov.ymlfile located in the project root directory. If you have a private repository and Codecov cannot be run, refer to I have a private repo and don’t have a Codecov paid plan. Can I modify the CI workflows for this situation?.The fourth workflow checks for a news file in the PR using
.github/workflows/check-news-item.yml. If no news item is included for the proposed changes, this workflow fails and leaves a comment prompting the contributor to submit a new PR with the appropriate news file. Please refer to the best practices section on news items.
In Level 5, I see that another workflow is running once a PR is merged to main. What is it?
The workflow .github/workflows/matrix-and-codecov-on-merge-to-main.yml is triggered. The goal is to ensure the latest code is tested not only on Linux but also across multiple operating systems and Python versions. This workflow runs tests on macOS (both Apple Silicon and Intel chips), Linux, and Windows and against three different Python versions, including the latest configured version. To modify the Python versions used in the workflows, refer to In Level 5, how do I set different Python versions for GitHub CI?.
Note
These workflow files call scripts located at https://github.com/scikit-package/release-scripts, which are centrally managed by the scikit-package development team. This centralized approach ensures that individual packages do not need to be updated separately when adding support for new Python versions or operating systems.
I am encountering a ‘build’ is requesting ‘pull-requests: write’ error. How do I fix it?
We’d like to have GitHub Actions write comments in the incoming pull request to guide us. We need to provide permissions in the GitHub repository settings by following the steps below.
Visit the Settings page of the GitHub repository.
Click on Actions in the left sidebar.
Click on General in the left sidebar.
Scroll down to the Workflow permissions section.
Select Read and write permissions.
Done!
What is the difference between pull_request and pull_request_target?
For the current GitHub CI for checking a news item, pull_request_target is used instead of pull_request as shown below:
name: Check News Item

on:
 pull_request_target:
   branches:
    - main
pull_request: This event configures theGITHUB_TOKENwith read-only permissions by default, especially when triggered by forks.pull_request_target: This event grants theGITHUB_TOKENwrite permissions, enabling it to perform actions that modify the repository, such as posting comments, updating pull request statuses, or merging code. The news CI creates a comment when an additional news.rstis not found under thenewsfolder. Hence,pull_request_targetis used.
Another key difference is that with pull_request_target, the .yml file must already be merged in the base branch at the time the pull request is opened or updated. For more, please refer to GitHub docs.
How can I add extra CLI commands in the GitHub workflow for running tests?
In the GitHub workflow files for testing, you might want to add extra CLI commands before running pytest. For example, you may want to install dependencies that are not available on conda-forge but are only available from PyPI to test your package.
To do so, you can enter the run: command under the with: section in the workflow file.
with:
  project: <package-name>
  run: |
    pip install <package-name>
    echo "Done installing <package-name>"
  ...
In Level 5, the relevant workflow files are
.github/workflows/matrix-and-codecov-on-merge-to-main.ymland.github/workflows/tests-on-pr.yml.In Level 4, the relevant workflow file is
.github/workflows/_tests-on-pr-no-codecov-no-headless.yml.
Here we provide a bit more context on how the run: commands are used. The extra CLI commands are inserted into the reusable GitHub workflow under the Run extra user-defined CLI commands section of the reusable workflow file:
- name: Install ${{ inputs.project }} and requirements
  run: |
    conda install --file requirements/conda.txt
    conda install --file requirements/tests.txt
    if ${{ inputs.c_extension }}; then
      conda install --file requirements/build.txt
    fi
    python -m pip install . --no-deps

- name: Run extra user-defined CLI commands
  run: |
    echo "${{ inputs.run }}" > user-commands.sh
    bash user-commands.sh
After this step, the reusable workflow then runs the pytest command. To see the full reusable workflow file, please visit https://github.com/scikit-package/release-scripts/blob/main/.github/workflows/_tests-on-pr.yml.
I have a private repo and don’t have a Codecov paid plan. Can I modify the CI workflows for this situation?
By default, the workflows in tests-on-pr.yml and matrix-and-codecov-on-merge-to-main.yml will have a section that uploads the code coverage to Codecov, and CI will fail if unsuccessful. Codecov is available for free on public repositories but requires a paid plan to run on private repositories. In the latter case, if you would like to turn off Codecov, we offer an alternative CI workflow that runs the tests without it.
In addition to being able to customize additional commands to be run in the run: section (see How can I add extra CLI commands in the GitHub workflow for running tests? above), you can also change the workflows that you want your repository to run. By default, scikit-package will run the tests-on-pr.yml and matrix-and-codecov-on-merge-to-main.yml workflows in the scikit-package/release-scripts repository. It is possible to override this default and run a different workflow for your CI if it is available in scikit-package/release-scripts. For example, for the situation above we offer we offer tests-on-pr-no-codecov.yml and matrix-no-codecov-on-merge-to-main.yml which run the tests without Codecov.
To do so, you can modify the script that your workflow files are calling in the uses: section. Normally, you’d be calling the following in tests-on-pr.yml and matrix-and-codecov-on-merge-to-main.yml, respectively.
uses: scikit-package/release-scripts/.github/workflows/_tests-on-pr.yml@v0
uses: scikit-package/release-scripts/.github/workflows/_matrix-and-codecov-on-merge-to-main.yml@v0
Instead, call the following in tests-on-pr.yml and matrix-and-codecov-on-merge-to-main.yml, respectively.
uses: scikit-package/release-scripts/.github/workflows/_tests-on-pr-no-codecov.yml@v0
uses: scikit-package/release-scripts/.github/workflows/_matrix-no-codecov-on-merge-to-main.yml@v0
Don’t forget to also delete the following section from your workflow files now that we are not uploading to Codecov in the workflows anymore.
secrets:
  CODECOV_TOKEN: ${{ secrets.CODECOV_TOKEN }}
Done! If you have a different situation that our current workflows have not accounted for, please feel free to contribute a new workflow file by making a PR.
Dependency management
What are docs.txt, tests.txt, build.txt, and conda.txt files under \requirements in Level 4 and Level 5?
- pip.txt:
list all PyPI packages required to install the package via pip install <package-name>.
- conda.txt:
list all Conda packages required for running the package in GitHub CI. It should be typically identcal as the
pip.txtfile.- tests.txt:
packages required for the testing suite to ensure all tests pass.
- docs.txt:
packages required for building the package documentation page.
- build.txt:
list all conda packages required for building the package in GitHub CI, including those specified in the build section of meta.yaml (conda-recipe).
What is conda-forge?
conda-forge is an open-source-software community-maintained channel on the conda/Anaconda package server. The structure of the Anaconda server is that packages are hosted and can be installed from user-maintained “channels”, and the original vision was that different developers and organizations would put their own code on their own channels.
conda-forge is a community led effort to have a single channel shared by everyone. This also allows the community to develop package maintenance tools to help with the ecosystem such as auto tick bots that check when the latest version of a package is not present on conda-forge and alert the maintainers, and GitHub workflows to pre-build wheel files for all platforms and python versions. It also tries to resolve a dependency graph for a package to install the most recent version of every package that satisfies the requirements of all the sub-packages.
We recommend making use of conda-forge and helping the community by, where possible, installing from conda-forge and also making sure your package is available on conda-forge so others may install it from conda-forge.
Here is how you can add the conda-forge channel to your conda configuration and install the scikit-package package from it:
conda config --add channels conda-forge
conda install scikit-package
The first command adds the conda-forge channel to the conda configuration, allowing users to install packages from this channel. The second command installs the scikit-package package from the conda-forge channel. https://anaconda.org/conda-forge/scikit-package
What are Miniconda, Anaconda, and Miniforge?
While conda is an environment and package manager, it is itself a piece of software that must be installed locally. Several installers are available for this purpose:
Miniconda: A minimal installer that includes only the necessary components to manage packages and environments. In
scikit-packagereusable GitHub workflows, we set upMinicondaas the default installer.Anaconda: A much larger installer that not only installs conda but also provides a pre-configured environment with Python and commonly used packages such as
numpy,pandas, andJupyter Notebook. This comprehensive solution is often used for educational purposes, as students do not need to manually install additional packages.Miniforge: Another installer that includes conda,
mamba, and Python, with theconda-forgechannel pre-configured. See the next section for more information on whatmambais.
Why do some people use mamba instead of conda?
Recall that conda is a dependency manager that uses sophisticated algorithms to identify compatible software versions. As the number of dependencies increases, the solving process can become computationally expensive.
To address this, mamba was developed. mamba uses the same commands and configuration options as conda but features a faster dependency-solving algorithm written in C++. mamba is also compatible with existing conda environments (e.g., environment.yml) and continues to rely on the conda ecosystem for package distribution, using channels like conda-forge. When you install mamba using Miniforge, the conda-forge channel is set as the default (and only) channel.
Why are both pip.txt and conda.txt provided?
Our preferred choice for installing the scikit-packaged package is as a Conda package, as outlined in the template README.rst file. With Conda, the end user can install all associated dependencies by running conda create --name new-env <package-name>. Additionally, the environment is tested via conda-forge CI before the conda package is released, which helps ensure the package’s compatibility with its dependencies. Hence, we list conda package dependencies in conda.txt.
However, we also want to allow users to install the package via pip. To support this, we provide a separate file for pip dependencies, pip.txt. In most cases, the dependencies listed in conda.txt and pip.txt will be identical. However, there can be exceptions. For example, matplotlib-base is preferred for Conda installations, while matplotlib is used for pip installations.
GitHub workflow
I am new to GitHub. Why do we use Git/GitHub?
GitHub allows multiple contributors to work on a software project simultaneously under an organization like Billingegroup or diffpy. There are two primary needs. First, we want to ensure that any changes under this organization are reviewed by the organization’s project maintainer. Second, we want to ensure we add new changes from the latest version of the code, particularly when working with multiple contributors across different time zones. Hence, we use GitHub to serve the needs with a specific workflow below. Please see below for an overview of the GitHub workflow.
What is the general the workflow?
Starting a new Python package in Level 4 and 5 requires a basic understanding of GitHub’s workflow, we will provide you with a brief overview and how to set up your repository.
First, if you are working on a package from an organization like github.com/diffpy or github.com/Billingegroup, you first copy the repository of the organization to your GitHub user account. This process is called forking.
Then, you will download the forked repository in your GitHub account to your local machine. This process is called cloning.
In the cloned repository on your local machine, you will make edits. You want to first add a description for the changes by “committing” with a message describing the changes. Then you will upload these changes to the forked repository in your account. This process of updating code from the local computer to the repository hosted by GitHub is called pushing.
From the forked repository, you then want to upload changes to the repository under github.com/scikit-package/scikit-package, for example. This process is done through a process called pull request. The Project Owner reviews this pull request and merges it into the Billinge group’s repository. If you are the contributor as well as the Project Owner, you would be the one who reviews your own code and merges your changes.
I have a general understanding of fork, clone, commit, push, and pull request. How do I set up my repository for packaging?
Please be familiar with the terminology such as “fork”, “clone”, “push”, and “pull request” explained above in What is the general the workflow?.
You may fork the repository using the “Fork” button on the top right corner of the repository page. This will copy the repository to your GitHub account. e.g., github.com/scikit-package/scikit-package to github.com/sbillinge/scikit-package.
Then download the forked repository under your account to the local machine by cloning:
git clone https://github.com/<username>/<package-name>
Now, you also want to link with the repository of the organization by adding the URL. Recall, we want to make changes from the latest state of the source code.
git remote add upstream https://github.com/<org-name>/<package-name>
Note
What is upstream? The repository that you forked from, e.g. scikit-package/scikit-package is referred to as the upstream repository.
Verify that you have the upstream URL set up as the organization.
git remote -v
Notice that you also have origin with an URL linking to your forked repository under your account. This is another GitHub jargon that refers to your forked repository.
Note
What is remote? The term remote is the opposite of local. In other words, remote refers to the repository that is hosted by GitHub. e.g., github.com/scikit-package/scikit-package or github.com/sbillinge.
Do you have a general summary of each term used in the GitHub workflow?
- fork:
The process of copying a repository from an organization to your GitHub account. e.g.,
github.com/scikit-package/scikit-packagetogithub.com/sbillinge/scikit-package.- upstream:
The repository of the original source code. e.g.,
github.com/scikit-package/scikit-package.- origin:
The forked repository under your account. e.g.,
github.com/sbillinge/scikit-package.- remote:
The repository that is hosted by GitHub. e.g.,
github.com/scikit-package/scikit-packageorgithub.com/sbillinge/scikit-package.- branch:
The branch serves as a folder that contains the files of the repository. The
mainbranch is the branch that is used for the final version of the code. Many branches can be created for different features or bug fixes that are later merged into themainbranch.- git clone:
The process of locally downloading a repository from GitHub (
remote) to your local machine.- git push:
The process of updating code from the local computer to the GitHub remote repository. Push can be made to the
originorupstreamrepository. But, in our workflow, we push to theoriginrepository, and then we create a pull request to merge the changes fromoriginto theupstreamrepository.- git commit:
The process of adding a description for the changes made in the files that are ready to be pushed.
- git add:
The process of selecting files to be included within a single commit.
I have cloned and added upstream. What is the next step?
We want to first sync our local folder with the upstream repository. This process is called pulling.
git checkout main
git pull upstream main
Above, we checkout the main branch of your cloned folder. We then download all the latest changes from the upstream repository. Recall that a GitHub repository is contributed by multiple contributors. Hence, we want to ensure that we are working with the latest version of the code in the main branch.
Once we are fully synced with the upstream repository, we can now start making changes to the code.
Instead of directly working in the main branch of your cloned repository, you will create a copy of main by “branching” it from main. Think of a tree. You can name it anything you want like docs-faq, etc.
git checkout -b docs-faq
The above command not only creates a new branch but also switches to the new branch. You can verify that you are in the new branch by running:
git branch
Of course, you can always switch back to the main branch by using git checkout main.
Now, you are ready to make changes to the code in the branch. If you have a README file in your project, try to modify it. Once you are done, you want to add the changes to a hidden folder called .git. This process is called staging.
git add README.rst
Then, now you want to commit the changes with a message describing the changes.
git commit -m "docs: added a FAQ section in the README"
Now, you want to push the changes to the origin repository under your account. Recall origin refers to the forked repository under your account hosted by GitHub.
git push --set-upstream origin docs-FAQ
Go to your forked repository under your account on GitHub. You will see a green button that says “Compare & pull request”. Click on it. You will see the changes you made in the branch. Click on “Create pull request”. Add a description of the changes you made. Click on “Create pull request”.
The reviewer will review the changes and merge them into the upstream repository. You have successfully made your first contribution to the organization’s repository.
I still need to make another pull request. How do I do that?
Now, you want to make another pull request. You want to make sure that you are working with the latest version of the code in the main branch.
git checkout main
git pull upstream main
The command above will sync your local folder with the upstream repository. It should download the changes made by other contributors as well as the recent commit you made in the docs-FAQ branch, for example.
Again, you checkout a new branch from the main branch. You can name it anything you want, e.g. docs-typo.
git checkout -b docs-typo
You repeat the process of git add, commit, push to your origin (your forked repository) and then make a PR to the upstream repository (the organization’s repository).
How can I automate the process of creating a new file from the command line?
Add the following line to ~/.bashrc or ~/.zshrc file:
alias cpnews="cp news/TEMPLATE.rst news/$(git rev-parse --abbrev-ref HEAD).rst"
Optionally, if you also want to apply git add for the news/<branch-name>.rst created, you can use the following command instead:
alias cpnews='cp news/TEMPLATE.rst news/$(git rev-parse --abbrev-ref HEAD).rst && git add news/$(git rev-parse --abbrev-ref HEAD).rst'
Run the following command to apply the shell configuration:
source ~/.bashrc
Now, whenever you want to create a news file for the PR, simply navigate to the top-level directory in the project and type cpnews on the command line.
You can then open the project in an editor. The news file located under news will have the name <branch-name>.rst where <branch-name> is replaced by the current branch name.
Add a description of the edits made in this PR. This should be a user-facing high-level summary of the edits made in this PR and will be automatically converted into the CHANGELOG.rst when the code is released.
See also
How do I write good news items? What if the changes in the PR are trivial and no news is needed? Please read our guide provided in Writing news items for release notes.
Maintaining scikit-package
How can I locally install scikit-package with edits I’ve made to the source code?
The package update and package create public commands automatically reuse templates saved locally to
~/.cookiecutters/. If you have made local edits to these commands and want to use/test them,
begin by moving into the scikit-package repository on your local machine and locally install
the package,
cd path/to/local/scikit-package
pip install .
Then remove the existing template in the .cookiecutters/ directory and
copy the current version of the scikit-package repository to the .cookiecutters/ directory,
rm -rf ~/.cookiecutters/scikit-package
cp -R . ~/.cookiecutters/scikit-package
If you want to test a git version of the template, you can also git clone
the repository to the .cookiecutters/ directory,
rm -rf ~/.cookiecutters/scikit-package
git clone https://github.com/scikit-package/scikit-package ~/.cookiecutters/scikit-package
Then run package create or package update command and
reply n to the first prompt asking you to redownload.
When should we expect different Python versions to be supported in the GitHub workflows?
Please check the Support Window section in the official Scientific Python specification: https://scientific-python.org/specs/spec-0000/
Which files should be modified when there is a new Python version?
When updating Python version support, please modify the following files accordingly:
In https://github.com/scikit-package/scikit-package:
File |
Variables to update |
|---|---|
|
|
In https://github.com/scikit-package/release-scripts, please modify the following file
.github/workflows/_get-python-versions.yml for new fallback Python versions.